
Osso Buco with Fennel and Blood Orange Sauce
from Bones: Recipes, History, and Lore
Four 1 1/2 to 2-inch pieces veal shank, about 12 oz each
2 TBSP flour
kosher salt and fresh ground black pepper
3 TBSP olive oil
3 TBSP red wine vinegar
1 cup White Veal Stock*
2 blood oranges
1 large fennel bulb with leaves
2 medium carrots, peeled and cut in 2 x 3/4 inch batons
1 cup blood orange juice (from about 3 oranges)
1 tsp fennel seeds, crushed
2 garlic cloves, finely chopped
*My substitution for this was 1/2 cup chicken stock, 1/2 cup beef stock, 4 TBSP veal demi-glace, all warmed in a small sauce pan to get a smooth texture.
Preheat the oven to 325. Pat the veal dry. With shears, cut completely through the membrane surrounding each veal shank in two places to prevent the meat from curling as it cooks. Ties a piece of butcher's twine around each shank to hold the meat in place while it is cooking. Season the flour with salt and pepper. Dredge the veal shanks in the flour, shaking off the excess.
In a large Dutch oven or flame-proof casserole, heat the oil over medium heat. Add the veal and brown on all sides, then transfer to a plate. Discard the fat from the pot, and pour in the vinegar and stock. Bring to a boil, deglazing the pot. Remove the pot from the heat.
Using a vegetable peeler, remove the zest in long strips from 1 orange and add to the pot; reserve the orange. Return the veal shanks to the pot, with the wider end of the bone facing up (to keep the marrow from escaping). Cover with a damp piece of parchment paper, then the lid, and braise in the oven for 45 minutes.
Meanwhile, remove the feathery leaves from the fennel, set aside. Trim any coarse stalks or outside layers. Cut the fennel lengthwise in half, then cut into 1/4 inch slices.
After the veal has cooked for 45 minutes, add the fennel, carrots, orange juice, and 1 tsp salt. Cook, covered, with the paper and lid, for another 45 to 55 minutes, or until the veal is very tender and the vegetables are cooked. Transfer the veal, fennel and carrots to a serving platter. Remove the strings from the veal and keep warm, loosely-covered with aluminum foil.
Discard the orange peel from the pot and bring the cooking juices to a boil; boil hard for 5 minutes to reduce. Grate the zest of the remaining orange and place it in a small bowl with the fennel seeds. Remove the pith from the two zested oranges and cut them into segments. Add the segments to the sauce and check the seasoning. Keep warm.
To make the gremolata, finely chop the reserved fennel leaves. Add the fennel leaves and garlic to the zest and fennel seed and mix. Serve the veal and vegetables with the sauce spooned over and pass the orange gremolata separately.
Notes: As with many New Year's dinners, I wanted to choose something I hadn't attempted before. These veal shanks came pre-cut at Cato Corner Farm. I'm a devotee of their cheese and on a recent visit noted they were also offering various cuts of veal.
This is a variation on the usual osso buco. Traditional gremolata is parsley, garlic, and lemon. The blood orange and fennel variation had a bright flavor and also incorporated the fennel greens. Overall, the citrus was perhaps a touch too pronounced here giving it a hint of bitterness in the aftertaste. But the veal was tender and the vegetables still had some bite to them. The bone marrow was a luscious treat.
Served with Val de la Pierre Chateauneuf-du-Pape 2008, decanted.
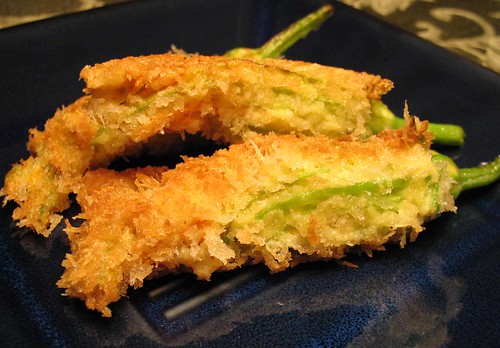
Goat Cheese Stuffed Squash Blossoms
a Jennifer original
2 TBSP pine nuts, toasted
1 TBSP heavy cream
3 oz. goat cheese
1/2 tsp thyme
6 squash blossoms
olive oil
1 egg
panko
Immediately upon purchasing, check the squash blossoms and be sure to remove the stamen and any bugs. Store in closed container on paper towels in the 'fridge. Best if used same day, of course. Wash gently before using and dry thoroughly on paper towels.
Let the goat cheese come to room temperature. Blend with the cream and then add the pine nuts and thyme. Stuff each blossom, twisting the petals closed gently.
Beat egg in a bowl and spread panko on a plate.
Most recipes call for deep-frying, but I decided to go with pan frying. Use a frying pan big enough to accommodate the blossoms, fill it with 1/4 inch olive oil and heat to 350 degrees.
Roll each stuffed blossom in the egg wash and then in the panko and then fry until crisp and browned -- about 2 minutes per side.
Notes: I'd never attempted fried squash blossoms before but the farmers' market had such lovely and colorful ones that I decided to give it a try. It went more smoothly than I expected and for my first attempt, I was more than pleased. The panko gave it a lovely crunch, though perhaps the thyme was a bit too strong. Overall, quite tasty.

Lamb Rib Chops with Mustard-Thyme Crust
5 TBSP dijon mustard
1 TBSP minced garlic
2 TBSP chopped fresh thyme
1 TBSP olive oil
6 lamb rib chops
1 cup panko
Preheat oven to 400 F.
Season lamb chops with salt and freshly ground pepper. Heat olive oil in skillet over medium heat. Sear chops in olive oil, 2 minutes per side. Reserve oil and pan.
Whisk together dijon, garlic and thyme. Press onto one side of chops.
Add panko to skillet in olive oil; stir until crumbs begin to crisp. Add more olive oil if too dry. Press mustard-side of chops into panko and place in oven-safe dish, mustard/panko side up.
Roast 20 minutes. Finish with broiler to crisp the crust.
Accompanied by asparagus:
Preheat oven to 400 F. Trim and clean asparagus. Spritz with olive oil and lemon juice. Roast for 20 minutes, turning halfway through.
Served with Vina Zaco 2006, bottled by Bodegas Bilbainas: a well-balanced Tempranillo wine that stood up to the flavors well. A rich nose of dark berry with a hint of chocolate in the finish.
Notes: This was well worthwhile. A great Easter dinner, and something to repeat. Having now had rib chops, it seems a challenge to go back to shoulder chops as these had much better texture (so tender) and depth. I hadn't previously roasted asparagus and this really brought out a lovely flavor - I especially loved the crispiness of the heads.
I'm still rather put out that Conde Nast decided to discontinue publication of Gourmet and finish out my subscription with issues of Bon Appetit. I've been trying to decide whether I will renew it or not and actually tried a recipe from a the most recent one I received. I was looking for a way to use up some leftover cilantro....
Pork Mole with Cilantro
based on a recipe
from Bon Appetit (April 2010)
2 teaspoons ground cumin, divided
2 boneless pork chops
1 tablespoon olive oil
1/2 cup coarsely chopped red onion
1 cup canned crushed tomatoes
1/2 cup low-salt chicken broth
2 tablespoons bittersweet or semisweet chocolate chips
3/4 teaspoon minced canned chipotle chiles in adobo or chipotle hot sauce
1/4 teaspoon ground cinnamon
1/2 teaspoon finely grated orange peel
Fresh cilantro leaves
Preheat oven to 350 degrees.
Rub 3/4 teaspoon cumin on each side of meat. Sprinkle with salt and pepper. Heat oil in large nonstick skillet over medium-high heat. Add meat to skillet and brown, about 6 minutes per side. Remove pork chops to oven to finish cooking. Add onion to skillet. Cook until onion is brown, stirring onion, 6 to 7 minutes. Add tomatoes, broth, chocolate, chipotles, cinnamon, and 1/2 teaspoon cumin to skillet. Stir 2 minutes. Add orange peel; season with salt.
Drizzle meat with sauce; top with cilantro leaves.
Notes: The original recipe at Bon Appetit is for steak. My version here also reduces the red onion. And I chose not to puree the sauce instead having something a bit more robust in texture, though I did allow it to reduce a bit longer before adding the orange peel. Should I make this again, I think I want to add some extra cinnamon to rub into the meat at the same time as the cumin. All the same this came out pretty well.

AKA Rabbit Braised in Oil Piedmont Style
from Fiamma
4 young rabbit hind quarters or 1 young rabbit, cut into serving pieces
sea salt and freshly ground pepper
1/2 pound fresh porcini or cremini mushrooms, wiped, stems trimmed, and quartered
1 medium yellow onion, cut into 1/4 inch dice (3/4 cup)
1 medium carrot, peeled and cut into 1/3 inch dice (1/3 cup)
1 medium rib celery, trimmed and diced (1/3 cup)
2 shallots, chopped
1 head garlic, loose papery outer skin removed and sliced in half horizontally
3 large sprigs fresh rosemary
3 large sprigs fresh sage
1/2 TBSP whole juniper berries
1/2 TBSP whole black peppercorns
2 to 3 cups olive oil, for covering the rabbit
4 cups mixed salad greens, washed and dried
juice of 1 lemon
Preheat the oven to 350 F. Season the rabbit liberally with salt and pepper. Put the rabbit, mushrooms, onion, carrot, celery, shallots, garlic, rosemary, sage, juniper berries, and peppercorns in a heavy pot just large enough to hold the rabbit in a single layer. Pour on enough olive oil to cover. Transfer to the oven and cook until the rabbit is tender, 1 to 1 1/2 hours. Begin testing after 1 hour. Remove the pot from the oven and let the rabbit cool to room temperature.
Spoon the mushrooms and vegetables over the rabbit and serve immediately.
Toss the mixed greens in a bowl with 3 to 4 tablespoons of the olive oil from the pot used to cook the rabbit. Add the lemon juice and salt and pepper to taste, and toss.
 Notes: 2009 New Year's dish. Served with Centine 2006, a blend of 60% Sangiovese; 20% Cabernet Sauvignon; 20% Merlot (aged an additional year in the wine cabinet) -- a bright fruity taste with medium to full-bodied mouth-feel. Bottled by Banfi (Montalcino).
I'd never done oil-braising before and had a brief moment of trepidation after settling on the recipe. The big surprise, however, was that the rabbit needed to be further butchered. In the past, it had come already cut into pieces. Despite wishing I had a boning knife, it turned out alright in the end. In any case, it came out really well -- infused with flavor and succulent. First recipe tried from this cookbook, and it bodes well for future applications....
As suggested in the cookbook, the leftover oil is also great to use for frying potatoes.
Also, leftovers re-heated a couple days later were really delicious; especially flavorful were the roasted mushrooms (should put more in the next time).
The leftover roasted garlic (if it doesn't entirely disintegrate) is good mixed into a spread or used to doctor up a pasta sauce.
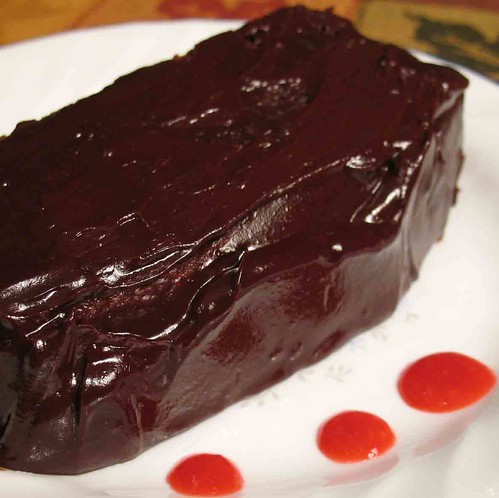
Dressy Chocolate Loaf Cake w/ Raspberry Coulis
adapted from Baking: From My Home to Yours
by Dorie Greenspan
1 1/2 cups all-purpose flour
1/2 cup unsweetened cocoa powder, less 1 tsp
1 tsp espresso powder
1 tsp baking powder
1/4 tsp baking soda
2 sticks (8 ounces) unsalted butter, at room temperature
1 1/2 cups sugar
2 large eggs
1 cup sour cream
Frosting:
5 ounces semi-sweet chocolate, coarsely chopped
1/2 cup sour cream, at room temperature
Center a rack in the oven and preheat to 350 F. Butter a 9 1/2 by 5 inch loaf pan, dust the inside with flour and tap out the excess. Place the pan on an insulated baking sheet.
Stir together the flour, cocoa, espresso powder, baking powder, baking soda and salt.
Working with the stand mixer, preferably fitted with a paddle attachment, or with a hand mixer in a large bowl, beat the butter and sugar together at medium speed for about 3 minutes, or until very light and fluffy. Add the eggs one at a time, beating for 1 minutes after each one goes in. Reduce the mixer speed to low and mix in the sour cream. Still working on low speed, add the dry ingredients and mix only until they disappear into the batter. Give the batter a last stir with a sturdy rubber spatula and scrape the batter into the pan.
Bake for 60 to 70 minutes, or until a knife inserted into the cake comes out clean. If, after about 45 minutes, the cake looks as if it's browning too quickly, cover it loosely with a foil tent. Transfer the pan to a cooling rack and let the cake rest for about 5 minutes before turning it out onto the rack. Cool to room temperature.
To make the frosting; Fit a heatproof bowl into a pan of gently simmering water, add the chocolate and warm, stirring occasionally, until the chocolate is melted. Still working over the hot water, stir in the sour cream. Don't be concerned if the cream tightens -- just keep stirring gently and the frosting will become smooth and glossy. Remove and cover the heat and cover the sidesand top of the cake with the still-warm frosting.
Raspberry Coulis:
1 cup red raspberries
1 1/2 TBSP sugar
Put the berries and sugar in a blender or food processor and whir until pureed. Taste and mix in more sugar if needed. Press the coulis through a strainer or a food mill to eliminate seeds.
Notes: The original recipe calls for a raspberry jam-based filling to be layered into the cake. Instead, this had a raspberry coulis, also from the same cookbook. This was a dense cake with a rich texture. The espresso powder was also an addition to give it a richer, deeper flavor. Yum.

Duck Breast with Orange Chipotle Sauce
adapted from Gourmet (October 2005)
For sauce
1 1/4 cups fresh orange juice
1/8 cup fresh lime juice
1 1/2 tablespoons maple syrup (preferably dark amber or Grade B)
1/2 tablespoon finely chopped canned chipotle chiles in adobo
1/2 (3- to 4-inch) cinnamon stick
1 tsp ground cloves
1 teaspoon salt
For duck
2 (7- to 8-oz) Long Island (also called Pekin) duck breast halves with skin
1 1/2 teaspoons salt
1/2 teaspoon black pepper
Boil all sauce ingredients in a 2- to 3-quart heavy saucepan over moderate heat, skimming foam occasionally, until syrupy and reduced to about 1/2 cup, 30 to 40 minutes. Let stand until duck is ready.
Preheat oven to 300 F. Crosshatch skin of duck breasts. Sprinkle duck with salt and pepper. Heat heavy large skillet over high heat. Add duck breasts, skin side down, to skillet. Cook until skin is well browned, about 4 minutes. Turn duck breasts over; cook 2 minutes. Remove from heat. Set rack in roasting pan. Transfer duck breasts to rack (reserve drippings in skillet). Roast duck to desired doneness, about 20 minutes for medium-rare. Remove from pan and let rest 5 minutes.
Before serving, deglaze skillet with sauce and add any drippings from the roasting pan.
Notes: I wanted something a little different for my birthday dinner. I'd settled on duck breast as a treat, but though I love Duck Breast with Orange Tea Sauce, I wanted to spice things up a bit. And this did the trick. At first bite, this is a little sweet and tangy (the lime juice), but then the heat starts to kick in. The recipe originally calls for the duck to be broiled, but I prefer this method. Served with Alton Brown's Perfect Fingerling Potatoes.
Alton Brown's Perfect Fingerling Potatoes
1 1/4 pounds kosher or rock salt
2 quarts water
2 pounds small fingerling potatoes, cleaned
4 tablespoons butter, optional
Freshly ground black pepper, optional
1 tablespoon freshly chopped chives, optional
In a large pot, combine the salt, water, and potatoes and bring to a boil. Cook until the potatoes are fork-tender, approximately 25 to 30 minutes. Remove from the pot to a cooling rack and let stand for 5 to 7 minutes. Serve as is or with butter, pepper, or chives.
Notes: The lovely thing about this recipe is the good clear taste of the potatoes. These came from a local farmers' market, and this was a great way to appreciate them.

Creme Brulee
from Glorious French Food
by James Peterson
3 cups heavy cream
1 vanilla bean, split in half lengthwise, or 2 tsp vanilla extract
8 egg yolks
3/4 cup granulated sugar (for the custard)
2/3 cup granulated sugar (for the glazing)
Preheat the oven to 325 F
Bring the cream to a simmer in a heavy-bottomed nonaluminum pot with the vanilla bean halves (if you're using extract, don't add it yet). Let the cream sit, covered, for 15 minutes to infuse the flavor of the vanilla. Spoon the vanilla halves out of the hot cream. Scrape out the tiny seeds with a paring knife. Put the seeds and the pod back into the cream.
Lightly whisk the egg yolks with the 3/4 cup sugar in a mixing bowl. If you're using vanilla extract instead of the bean, whisk it into the egg yolk mixture.
Strain the hot cream, a bit at a time, into the egg mixture. Don't use too fine a strainer or you'll strain out all the specks of vanilla, which look great in the creme brulee. Discard the pod. Stir the egg mixture with the whisk for a few seconds after each addition of cream so the hot cream doesn't curdle the yolks. Don't whisk the egg mixture or you'll make it frothy and it won't be smooth on top when you bake it. Just stir gently, making sure you're incorporating the egg yolks into the cream.
Ladle the cream mixture into one medium-size gratin dish, or six 5- or 6-ounce individual gratin dishes or ramekins. Arrange the dish or dishes in a baking dish with high sides and place it on the oven rack. Use a teakettle or ladle to pour in enough hot tap water to com halfway up the sides of the molds. Cover the bain-marie with a sheet of aluminum foil to prevent the custards from forming a crust on top.
Start checking the custards after about 45 minutes by peeling back the foil and wiggling them very slightly back and forth. If they're not done, the surface will ripple. As they continue to cook, the ripples will appear only in the smaller area near the center of the custard. When there's no rippling at all, take the bain-marie out of the oven, and then take the custards out of the bain-marie. Let them cool for at least 30 minutes. Refrigerate them for at least 1 hour, but preferably overnight. At this stage you can leave them, covered with plastic wrap, in the fridge for several days.
When you're ready to glaze the custards, which should be cold, glaze them within a couple hours of serving. Use a spoon to sprinkle them with a thin layer of granulated sugar just thick enough so you can't see the top of the custard.
It's easiest to glaze the creme brulee by waving the flame of a small propane torch over their surface, until the sugar melts into a shiny caramel glaze. Allow them to cool 5 minutes before serving.
Notes: Creme brulee is one of my most favorite desserts but I have never previously attempted to make it at home. Then some brave person decided to give me a plumbers' torch as a gift. After all, it's something every girl should have in their kitchen, as I learned from watching Julia Child. With that obstacle removed, it was only a matter of time. I opted to try this recipe as I found the instructions for the bain-marie (on the previous page, not included here) and the cooking of the custard more detailed than some. Now that I've done it, I might try some variations from elsewhere. I need to concentrate on getting a smoother texture for my custard, but the overall flavor and the glaze came out quite well. And, oh yeah, the torch was fun.
At a recent farmers' market, I ran across -- and bought -- Japanese eggplant, which I had never cooked with before. In fact, I haven't consumed any variety of eggplant in a very long time after an unfortunate eggplant parmesan encounter when I was quite young. This recipe may have broken that block...
from Martin Yan's Chinatown Cooking
For the Sauce:
1/3 cup chicken stock
1 TBSP hoisin sauce
2 tsp soy sauce
2 tsp lemon juice
1 tsp plum sauce
4 Asian eggplants (about 1 pound), stems removed
vegetable oil for deep-frying
2 tsp minced garlic
1 tsp minced ginger
1/2 jalapeno chili, sliced into rings
pinch of ground Sichuan peppercorns
basil leaves
chopped cilantro or sliced green onions
Prepare the sauce: Stir the chicken stock, hoisin sauce, soy sauce, lemon juice and plum sauce together in a small bowl until blended.
Cut the eggplant lengthwise into quarters, then cut crosswise into 3-inch pieces.
Pour enough oil into a 2-quart saucepan to come to a depth of 3 inches. Heat over medium heat to 350 F. Deep-fry the eggplant in batches until tender, 1 1/2 to 2 minutes. Remove with a slotted spoon and drain well on paper towels. Reserve the oil.
Heat a wok over high heat until hot. Add 1 TBSP of the reserved oil and swirl to coat the sides. Add the garlic, ginger, chili, and Sichuan peppercorns and stir-fry until fragrant, about 20 seconds. Add the sauce and bring to a simmer.
Add the eggplant and stir to coat. Scoop onto a warm serving platter. Serve garnished with basil leaves and cilantro or green onions.
Notes: As per the recommendation in the book, this was served with strips of pork marinated in char siu sauce and also stir-fried. This nicely complimented the spicy flavor of the eggplant dish, and that was even with the fact that I ended up leaving out the sliced jalapeno.

